Productivity Features
The Lending & Deposits platform includes several productivity features to help you work more efficiently. These tools streamline common tasks and improve workflow management.
Overview of Features
| Feature | Description | Benefit |
|---|---|---|
| Reminders | Schedule follow-up reminders | Never miss important dates |
| Assignment | Assign applications to users | Clear ownership and accountability |
| Notes | Add notes to applications | Document important information |
| Withdrawal | Withdraw applications | Clean pipeline management |
| Locking | Lock applications for editing | Prevent conflicts |
| Mark Complete | Mark tasks as complete | Track progress |
| Send App Online | Send link to applicant | Enable self-service |
| Queue Management | Manage work queues | Efficient workload distribution |
Reminders
Reminders are a great way to stay up-to-date on prospects or applicants. When a reminder is set for date on an application, the application will be bumped to the top of your queue when the date hits alongside a bell/reminder icon.
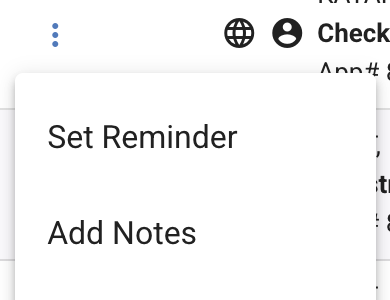
To create a reminder from the Dashboard page, click the ellipsis to the right of the pencil. If you're on the application page, click the hamburger icon located at the top-right of the page.
Reminders or automatic follow-ups with applicants are also built into the system. These reminders go out via email and sms to applicants that are not making progress in their application. Your marketing team can work with Lending & Deposits team to activate these, or administer them under "Email & SMS Admin" from the admin options.
Set reminders for:
- Follow-up calls with applicants
- Document collection deadlines
- Rate lock expirations
- Funding target dates
Assignment
While the back office automation is created for a hands-off LOS experience for your financial institution, you can self assign or assign applications to other team members to update information on the application. When clicking the pencil icon to open an application, you will receive the below prompt:

When viewing an application with no intent to change any details, click "No". If you are entering and application to make updates, click "Yes".
Assigning the application to yourself or someone else can also be executed by clicking the ellipsis to the left of the application and clicking either "Assign to Me" or "Assign to Employee".
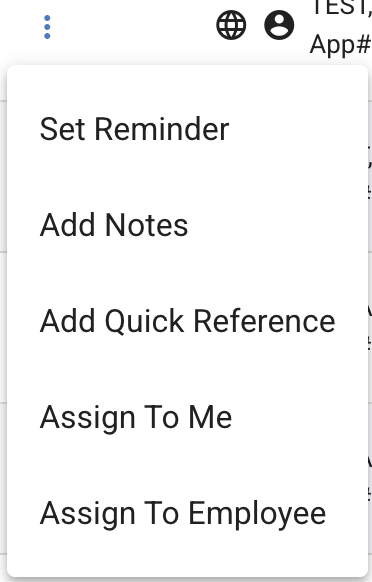
To assign from the application page, click the hamburger icon in the top-right hand corner and select the applicable option near the end of the menu.

Notes
Your financial institution can utilize the Notes feature to document important information and communication on applications. In addition to this, automated notes are created during each step of the application.
To view the automated notes, access the application and navigate to the "Event History", located on the left side of the screen. These event notes contain information regarding status updated, applicant information changes, IP address information, and more.
To view or attach manual notes to an application, click the ellipsis from the Dashboard page or click the hamburger icon on the application page.

Notes are visible to all users with access to the application. Do not include sensitive information unless necessary.
Withdrawal
Withdraw applications that will not proceed to funding.
Withdrawal Process
-
Open the application
-
Click Withdraw button
-
Select withdrawal reason:
- Applicant request
- Unable to contact
- Does not qualify
- Duplicate application
- Other
-
Add withdrawal notes (optional)
-
Confirm withdrawal
Withdrawal Effects
When an application is withdrawn:
- Status changes to "Withdrawn"
- Application moves to archived queue
- Stipulation requests are cancelled
- Applicant may receive notification
- Metrics exclude withdrawn applications
Reopening Withdrawn Applications
Some withdrawn applications can be reopened:
- Find the withdrawn application
- Click Reopen (if available)
- Provide reopening reason
- Application returns to previous status
Locking
Lock applications to prevent other users from editing.
How Locking Works
| State | Who Can Edit | Indicator |
|---|---|---|
| Unlocked | Any authorized user | No indicator |
| Locked | Only the locking user | 🔒 Lock icon |
| Auto-locked | User currently viewing | 🔒 (auto) |
Manual Locking
- Open the application
- Click Lock button
- Application is locked to you
- Click Unlock when finished
Auto-Lock Settings
Configure auto-lock behavior:
- Auto-lock on open - Lock when user opens application
- Auto-unlock on close - Release lock when user leaves
- Lock timeout - Auto-release after inactivity
Lock Override
Administrators can override locks:
- View locked application
- Click Override Lock
- Provide reason
- Lock transfers to admin
Always unlock applications when you're done to prevent blocking colleagues.
Mark Complete
Track task completion within applications.
Completing Tasks
- View the task list or checklist
- Click the checkbox next to completed items
- Task shows as complete with timestamp
Task Types
| Type | Description |
|---|---|
| Stipulations | Required documents/verifications |
| Review Steps | Processing checklist items |
| Approval Steps | Underwriting requirements |
| Funding Tasks | Pre-funding checklist |
Task Management
- Add custom tasks - Create ad-hoc tasks
- Reassign tasks - Move to another user
- Set due dates - Deadline for completion
- Add notes - Document completion details
Send App Online
Send a link to applicants to complete or resume their application.
Sending Application Link
-
Open the application
-
Click Send App Online or Resume Link
-
Choose delivery method:
- Email - Send to applicant's email
- SMS - Send text message
- Copy Link - Copy URL manually
-
Customize message (optional)
-
Click Send
Use Cases
| Scenario | Action |
|---|---|
| Incomplete application | Send link to complete |
| Additional information needed | Request specific data |
| Document upload | Enable document submission |
| E-signature | Send signing link |
Link Security
- Links expire after configured time (default: 72 hours)
- One-time use or multi-use options
- Requires applicant authentication
- Activity logged for audit trail
Queue Management
Organize and manage work queues efficiently.
Queue Types
| Queue | Description |
|---|---|
| Personal Queue | Your assigned applications |
| Team Queue | Shared team applications |
| Product Queue | By loan/account type |
| Status Queue | By application status |
| Priority Queue | High-priority items |
Queue Actions
| Action | Description |
|---|---|
| Claim | Take ownership from shared queue |
| Release | Return to shared queue |
| Transfer | Move to another queue |
| Prioritize | Mark as high priority |
| Escalate | Move to supervisor queue |
Queue Settings
Customize your queue experience:
-
Click Queue Settings or gear icon
-
Configure:
- Default sort order
- Visible columns
- Auto-refresh interval
- Notification preferences
-
Save settings
Workload Balancing
Managers can balance workloads:
- View queue counts by user
- Redistribute applications
- Set capacity limits
- Monitor processing times
Keyboard Shortcuts
Speed up your work with keyboard shortcuts:
| Shortcut | Action |
|---|---|
n | Add note |
r | Set reminder |
a | Assign |
l | Lock/unlock |
w | Withdraw |
s | Save |
Esc | Close modal/cancel |
Best Practices
Daily Workflow
- Start of day - Review reminders and queue
- Process priority - Work high-priority items first
- Update notes - Document all significant actions
- End of day - Set reminders for tomorrow
Team Coordination
- Use assignment to clarify ownership
- Add notes for handoffs
- Lock applications when editing
- Monitor shared queues regularly
Efficiency Tips
- Use keyboard shortcuts
- Set up saved filters
- Configure auto-assignment rules
- Batch similar tasks together
Continue to Applications Overview to learn about working with individual applications.